Wednesday, August 24, 2016

iPhone won't Charge? Here's How to Fix

"My iPhone 4 has stopped charging. I have tried four different cables, none work. One was brand new, but it will charge on an old Dick Smith brand iPod dock in the office at work. I can’t connect to my PC with it either. Any ideas?"
It's a quite frustrating thing that your iPhone isn't charging when your plug it in. Have you ever got iPhone not charging error before? Do you know what reason that caused the iPhone won't charge issue? And what to do when iPhone won't charge? Here's answer that you need.

1. Check for the iPhone Charging Port

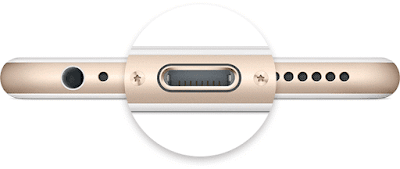
One of the primary reasons that an iPhone won’t charge is remarkably simple; the port on the iPhone is clogged with dust, debris, pocket lint, or some other obstruction. Therefore, if you find any obstructions, get it out of there, preferably with something like a Q-Tip, toothpick, or a dry toothbrush. Then firmly plug your charging cable into your device. If the charging port is damaged, your device probably needs service.

2. Change the Wall Outlet or USB Port

The second common reason an iPhone won’t charge is because of where it’s actually plugged into. Sometimes the wall outlet itself isn’t working or the light switch is turned off. Therefore, if you’re using a wall charger, you can then change the outlet.
If you’re charging the iPhone from a USB cable connected to a computer, sometimes the USB port on the computer itself isn't working. Try another USB port on the computer, PC or Mac doesn’t matter, that often fixes the issue too.

3. Check the USB Cable for Damage

Damage to the USB charging cable will prevent an iPhone from charging. This can be somewhat obvious in some situations, and if the cable is fraying or torn, well, there’s your problem. If your cable is damaged, you need a new USB cable to charge the iPhone, it’s that simple. You can go to Amazon or other online store to get a cheaper iPhone USB cable alternative, which works well, too.

4. Force Reboot Your iPhone

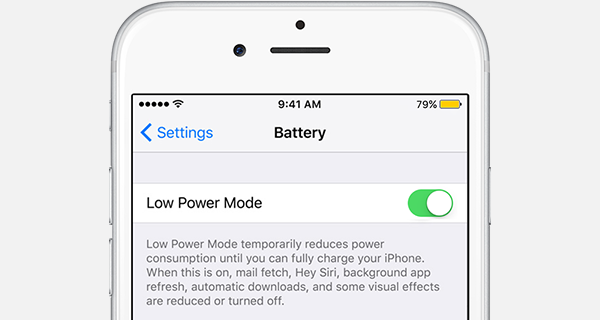
Rarely needed, but sometimes a simple reboot can resolve a software issue that basically refuses to acknowledge the device is charging. This is somewhat rare, but it can happen. Force restart your device: Press and hold the Sleep/Wake and Home buttons at the same time for at least 10 seconds, until you see the Apple logo. Then let your device charge for another half hour.


If your device still won’t power on or charge, take your device, charging cable, and charging adapter to an Apple Retail Store or Apple Authorized Service Provider for evaluation. You can also contact Apple Support.


Monday, August 15, 2016

How to Factory Reset iPhone with/without iTunes

If your iPhone is frozen or you just want a brand new iPhone, you can reset your iPhone to satisfy your needs. But please note that factory reset process will remove all data and settings on the device, meaning you will lose everything that is stored on your iPhone, like pictures, music,  notes,  specific app data, etc. If you are looking to avoid that data loss, you need to backup the iPhone with iTunes or back up iPhone to iCloud beforehand, that way you can restore personal data after the reset if you want to.
Now, the post will show you  how to factory reset iPhone with or without iTunes. 

1. Factory Reset iPhone with iTunes

Before you start restoring iPhone to factory settings, please note that you need to install the latest version of iTunes on your PC or MAC. Then go to Settings > iCloud to turn off Find My iPhone. Now, the detailed restoring steps are as follows.
Step 1. Plug iPhone into the computer with the USB cable. The iTunes on your computer will automatically launch. If not, double-click the icon to start it.

Step 2. Click the name of your iPhone at the upper right corner of iTunes, and then the information of your iPhone will be shown. Click the “Restore iPhone” button in the window to start.

Step 3. iTunes will ask whether you want to back up iPhone before restoring. You’d better choose “Yes” for the reset will erase the contents in your iPhone. Then iTunes will start restoring your iPhone to factory settings.
Step 4. Click Restore again to confirm. Then iTunes erases your iPhone and installs the latest iOS or iPod software. After you restore iPhone to factory settings, it will restart. Now you can set it up as new.


2. Factory Reset iPhone without iTunes

If you have no computer at hand, you are able to reset your iPhone to factory setting without iTunes. The following steps will show you how to do that.
Step 1. Open the Settings app and tap "General." Then scroll to the bottom and tap "Reset."
Step 2. Tap "Erase All Content and Settings."
Step 3. You will need to enter your restrictions password and your screen lock password in order to proceed with the reset.

The reset process usually takes about 20 minutes or so to complete. Your iPhone may reboot during the reset process. Therefore wait for the reset patiently!
The above two methods are about how to reset iPhone with/without iTunes. Operating processes are both not complicated. If you have the relative need, try it by yourself! 

Thursday, August 11, 2016

Your iPhone Battery Drains Too Fast, How to Fix?

After updating to the latest iOS version, many iPhone users may find that their iPhone battery is draining more faster than before. It's a frustration that you need to charge your iOS devices every single hour because your iPhone battery drains fast. iOS does report the percentage of power use in the top right corner of your iPhone screen. Imaging that when you are playing games, watching videos, chatting with friends or listening music, your iPhone suddenly reminds you that you have to charge your iPhone. Do you like that? I think that your answer must be "NO! I hate it!"

Now, here i will provide several solutions that you can take advantage of to fix iPhone battery draining fast issues. Try out these iPhone battery tips to bring your battery life back up to where you can get several days of standby, or at least get through a whole day without recharging. Let's see how to do that.

1.  Turn on Low Power Mode

If you have installed  iOS 9 or later on your iPhone, then you can take advantage of Apple’s Low Power Mode to save battery life on iPhone. You’ll find the toggle to turn it on in Settings > Battery > Low Power Mode. After turning on Low Power mode, it will temporarily turn off or reduces mail fetch, Siri functions, background app refresh, automatic downloads, and some visual effects until you fully charge your iPhone.

2. Disable Location Services

Disabling the Location Services on your iPhone results in far less WiFi and GPS activity, which in turn reduces overall power consumption by quite a margin. Go to “Settings” and tap on “Privacy”, then “Location Services” and disable the toggle at the top to turn off the Location Services. Alternatively, you can adapt the list of apps which are allowed to use your location if you prefer to keep it on, but still want the benefit of reducing the location queries that make your battery drain faster.


3. Disable Wi-Fi/Bluetooth

When you are walking on the road or doing other things with no need to use Wi-Fi and Bluetooth, you can turn off Wi-Fi or Bluetooth to save iPhone battery life. 
You can simply swipe upwards from the bottom of your screen to access the Control Center and tap the Bluetooth icon in the center. While Bluetooth is turned off, the icon will appear more dimly in color. You can also swipe up from the bottom of your screen and tap the little wireless icon in your Control Center to switch it off.


4. Turn off iCloud

Automatically backing up iPhone data to iCloud will drain your battery and eat through your data allowance. It’s a useful feature for backing up precious photos, but there might be a few things being backed up that you don’t really care about or need. Therefore, you can close the function of automatically backing up with iCloud. Take a look in Settings > iCloud and toggle off anything you don’t want. When you want to backup to iCloud again, you can turn on iCloud app.

5. Disable Background App Refresh

Go to Settings > General > Background App Refresh and take a look at the list, you will find that many apps on your iPhone are updating automatically.  Do you really need all those apps updating themselves in the background and draining your iPhone battery life? You can turn off all the apps you don’t need to update automatically. Remember, they’ll still update and work as normal when you fire them up, they just won’t keep running when you’re not using them.

6. Adjust iPhone Screen Brightness

The too bright screen drains iPhone battery faster than anything else, The brighter it is, the faster it drains. Therefore, the easiest way to solove the issue of iPhone battery draining fast is to reduce your iPhone screen brightness. Go to Settings > Wallpaper & Brightness and turn Auto-Brightness off. Then, set your brightness to the lowest setting that still looks readable. You might have to tweak it from time to time, but you’ll save a lot of juice this way. You can simply swipe upwards from the bottom of your screen to access the Control Center and adjust iPhone screen brightness with ease.

7. Close Push Notifications from Apps

Some apps will send you notifications every day that you don’t really need. Go to Settings > Notification Center and look under Include. Tap on any apps that you don’t need notifications from and choose None under the Alert Style, and then toggle Show in Navigation Center to off and Show on Lock Screen to off.


Wednesday, August 3, 2016

Forget Your iPhone Password? Here's How to Fix

Password is an effective and essential way for iPhone users to protect personal privacy. But if we don't use our iPhone for a long time, we may forget the password. It is the quite frustrating thing for us to forget all kinds of passwords, which means that we need to waste a lot of time to find them back or reset a new password. Especially, forgetting iPhone password will affect our daily life and works. Therefore, it is important for you to know how to reset iPhone password in quick ways. Here we introduce three ways to help you reset your iPhone password.

1. Using iTunes

Step 1. Connect your iPhone to the computer that your iPhone has trusted with a USB cable.
Step 2. Launch iTunes. If you’ve synced your iPhone with iTunes, then no “enter password” is required.
Step 3. iTunes will automatically sync your iPhone and create a backup file. If it doesn’t, you should sync your iTunes and create a backup file manually by in the Summary window.
Step 4. In the Summary window, you can see the option “Restore iPhone”. Click it and follow prompts to choose the latest iTunes backup to restore your iPhone.
Step 5. After the restoration process is complete, your passcode will be erased and all your data will be restored from your backup. You will now be able to access your iPhone without any passcode. And you can set your new password on iPhone.

Note: If you have synced your iPhone with iTunes before you forgot your iPhone password, you can reset your iPhone by using iTunes. Otherwise, you have to reset iPhone password with Recovery Mode mentioned below.

2.  Using iCloud Find My iPhone

Step 1. Go to icloud.com and log in with your Apple ID and password on your computer.
Step 2. Click Find My iPhone. Then click All Devices at the top of your browser window.
Step 3. Select your iPhone from all the devices listed. Click Erase iPhone to erase your iPhone along with its passcode.
Step 4. Use the Setup Assistant on your device to restore the most recent backup of your device.
Step 5. After the restoration process is finished, your passcode will be erased and all your data will be restored from your iCloud backup. You will now be able to access your iPhone without any passcode.

Note: Before you use the method, you should ensure that Find My iPhone app is ON.

3. Using Recovery Mode

If the above two methods don't work well, you can try resetting iPhone password by using Recovery Mode.
Step 1. Disconnect all cables from your iPhone and turn it off.
Step 2. Press and hold the Home button and connect your device to iTunes. If your iPhone does not turn on, please turn it on manually.
Step 3. Continue holding the Home button until you see the Connect to iTunes screen. iTunes will remind you that it has detected your iPhone in recovery mode.
Step 4. Click OK. The Summary tab in iTunes appears. Click “Restore iPhone” and restore your iPhone.

Note: Recovery Mode will erase all your data and passcode from your iPhone, resetting it to factory defaults. Thus, you’ll have a brand new iPhone without any personal data after you reset iPhone password with Recovery Mode. 

4. How to Create A New Password?

If you remember your current iPhone password and you just want to change  a new password, you can finish it with ease. 
Step 1. Go to Setting > Touch ID & Passcode (iOS 9/8/7) or Passcode Lock (iOS 6),


Step 2. Enter the current password and tap Change Passcode. Then enter the new passcode.

Conclusion:

Resetting iPhone password is actually not complicated if you follow the steps mentioned above. If you have synced your iPhone with iTunes before or if you have enabled your Find My iPhone on, you'd better try the first two methods. Since Recovery Mode will erase all your data from iPhone after resetting, please consider carefully whether you need to use this method to reset password on iPhone.