Wednesday, October 26, 2016

iTunes Can't Recognize iPhone in Windows 10? Fixed


If you recently upgraded your computer to Windows 10, you might meet the “iTunes not recognizing iPhone in Windows 10″ issue . No worries. In this post we are going to tell you how to fix iTunes not recognizing iPhone in Windows 10 computers. 
Now, the following solution may help you fix the iTunes issue if you found that your iTunes does not recognize iPhone in Windows 10 computer.
Step 1. Connect your iPhone to computer and wait for some time until the device is recognized.
Step 2. Right-click “Computer”, Go to “Device Manager”. Then expand category “Universal Serial Bus controllers” and locate “Apple Mobile Device USB Driver”.

Step 3. Right-click “Apple Mobile Device USB Driver” and click “Update Driver Software”. On the pop-out window, choose “Browse my computer for driver software”.

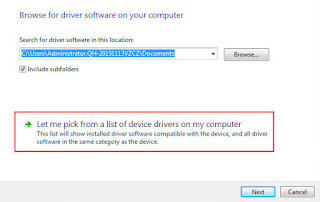
Step 4. Then choose “Let me pick from a list of device drivers on my computer”.

Step 5. Click “Have Disk…” button.

Step 6. Click “Browse”.
Step 7. Navigate to “C:\Program Files\Common Files\Apple\Mobile Device Support\Drivers”. Then double-click the usbaapl file. If you have a 64-bit version of Windows, this file will be called usbaapl64.

If you don’t see usbaapl64 here or if there isn’t a Drivers folder, look in “C:\Program Files (x86)\Common Files\Apple\Mobile Device Support\Drivers”.
Then you need to install the driver for your Windows 10. After installing, unplug your iPhone, then reconnect it using USB cable. Open your iTunes and see if your iPhone can be detected or recognized by iTunes.
Note:
  • Make sure that you have the button Trust this computer on your iPhone when connecting to your PC.
  • Make sure that you have installed all Windows updates. This is to make sure that your computer device drivers are up to date.
  • Make sure your iPhone USB cable works well.
  • Make sure your iOS device is turned on.
  • Make sure you have the latest version of iTunes installed.

Tuesday, October 11, 2016

How to Fix iPhone Camera Not Working


"I don't know why my camera is not working, I am sure it is a software problem, it just shows a black page. All features are working but it doesn't show an image. It is not working on other apps, like Instagram, as well. The front camera is not working. I have tried to "Reset All Aetting" option but it is not working neither. I upload a photo which is the screenshot when I run camera How can I solve this problem?"

Taking beautiful photos with iPhone Camera is easy for us. But many people reported that their iPhone camera not working issue. Therefore, how to fix it? In this article, we will focus on showing you how to fix it when you find that your iPhone camera won't work?

1. Force the Camera App to Close

This is the easiest but useful way to fix iPhone camera not working issue. To force the camera app to close, tap on the Home button two times, and you’ll get the preview of the apps you have been used. What you need to do is to find the Camera app, and swipe up to close it. Go back to the Home screen, and launch the Camera app again.

2. Try The Third-party Camera App

There are many third party camera apps for iPhone that you can find in the App Store, such as VSCO, FoToRus, etc. After you download and install one of them on your iPhone, try to take some photos with it. If this app works fine, try again to use the iPhone default camera app. If it doesn't well, you may need to find other ways.

3. Restart Your iPhone

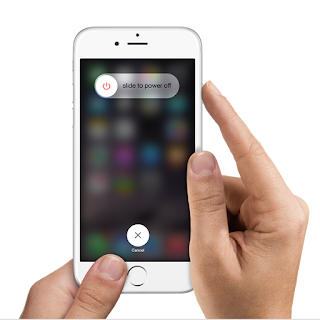
You can also restart your iPhone, and then launch the Camera app again. To turn off your phone, press and hold the sleep/wake button, then drag the slider to power off. Usually, when you do this, which is basically a restart, you turn it back on right away. Wait for a while, and then turn it back on.


4. Toggle Low Power Mode on or off. 

Some iPhone users have successfully dealt with camera problems by simply toggling the Low Power Mode feature on their device. After you toggle this feature on or off, reboot your iPhone and then open the Camera app. You can give it a try this time and see if it too does wonder to you as well.

5. Update IOS

The software bug could cause your iPhone camera is not working. To get rid this problem, updating the iOS to the latest version seems to be a great idea. You can check if there is an iOS update, go to "Settings > General > Software Updates". If there is a new Software update available, iPhone will download the update first. Once it’s done tap Install. When the update complete installation of itself, the device will automatically reboot and boot back up as normal when finished.

6. Reset All Settings

Reseting all settings on your iPhone may help you solving this issue. Launch Settings and select General. In General window, scroll down until you find "Reset", and tap on it. In the next window, choose "Reset All Settings". You will need to enter your passcode. Once it’s done, hit "Reset All Settings" in the popup window to confirm the action.

7. Erase All Content And Settings

This is effective, but should be taken as a last resort. You should back up the files on your device to iCloud or PC backup. Because this method will erase all your content and settings on your iPhone. You just need to go to "Settings > General > Reset" and then choose "Reset All Contents and Settings", then you will get all the files in your iPhone erase.

If you still can't solve the problem, you can also take it into an Apple Store and show the iPhone camera not working issue to them. If you're still under warranty, then you should get a replacement without any hassle.